
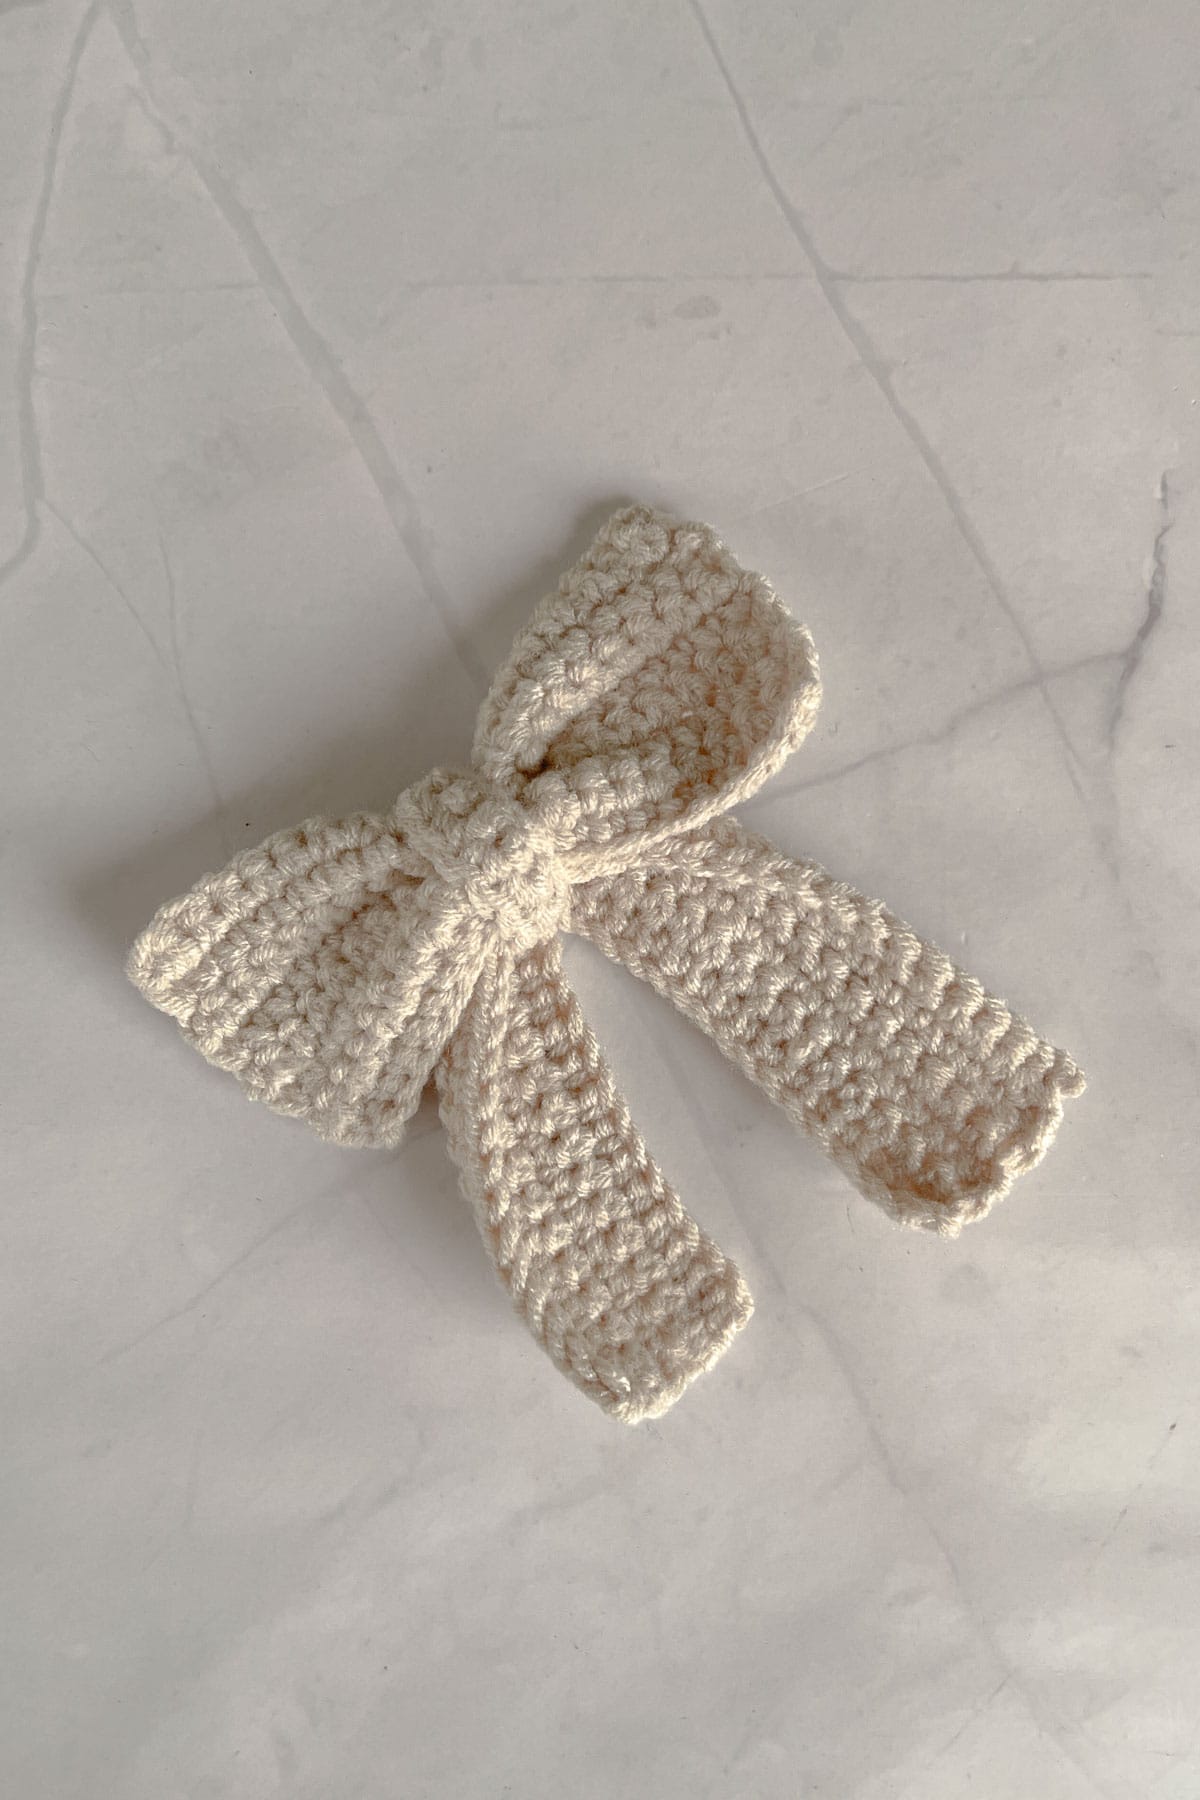
Looking for easy crochet bow pattern with tails? Here is a free tutorial for you. Made using basic stitches of chains and single crochets, these bow is fairly quick and easy to make.
You can use the pattern to make adorable bows in different sizes by simply changing the thickness of your yarn and by reducing or increasing the number of stitches and rows.

This bow is adapted from my basic 'how to crochet a bow' tutorial. I have increased the size of the bow and added long tails to it. This design works great as a hair bow (by attaching the bow to hair accessories like a hair tie or a french barette with hot glue or simple stitches). It can also be used as a fun craft project or gift bows.
You can also use this pattern to make a bow tie by omitting the tails.
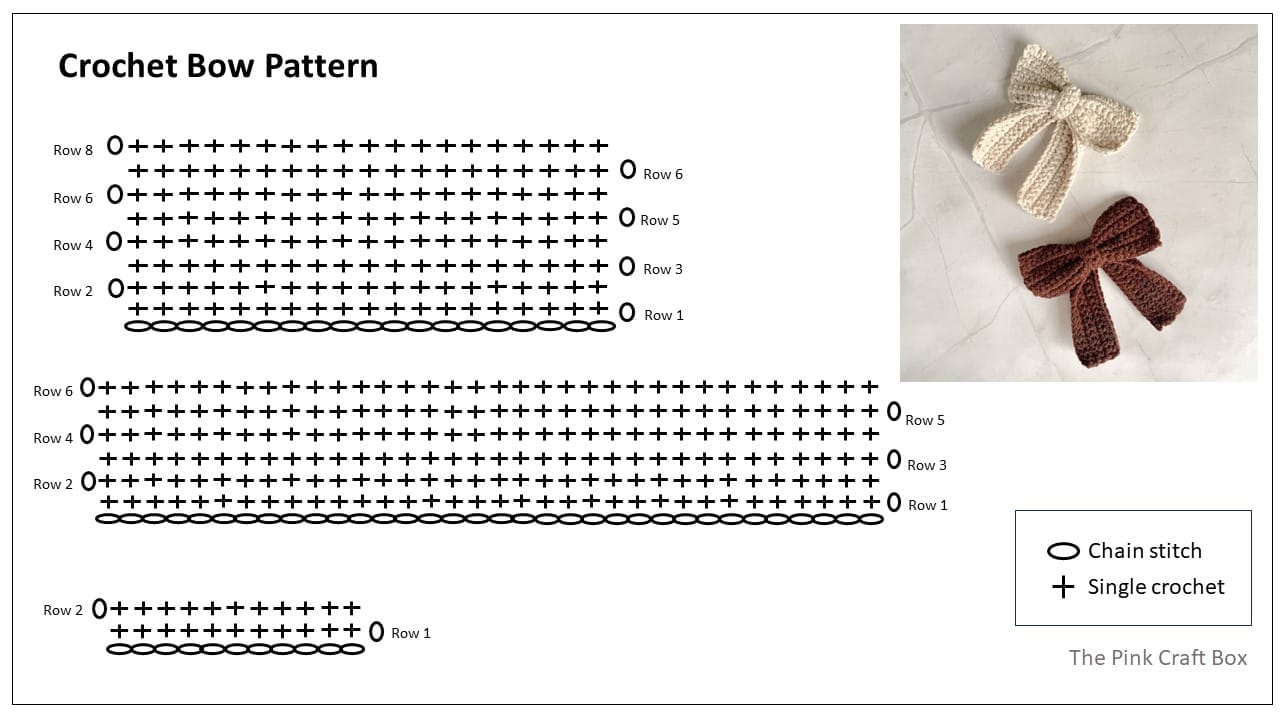
The bow is made using medium weight yarn (you can use any worsted weight yarns). It consists of 3 parts i.e. the main bow part, the tails part and the center part.
The first part is made up of a row of 20 chain stitches and continued with 8 row counts of single crochets. The second part, i.e. the tails is made up of a row of 35 chain stitches and 6 rows of single crochets. The third part which is the center tie for the bow is made up of a row of 12 chains and 2 rows of single crochets.
Each completed bow measures 10.5cm by 10cm (with tails) at the widest and longest parts. The final size of the bow will depend on the yarn weight and tension of the yarn used as well as the hook size.
If you like these crochet bows, you should also check out my basic tutorial on how to make bows without tails. They make a great crochet project for beginners and are a great way to use up scrap yarn.
And if you are into making crochet hair accessories, check out my crochet hair bows pattern tutorial where I have shared a simple pattern for little crochet bow and 2 lacey designs made using DK weight yarn. These bows make perfect hair clips (like a snap clip, french barrete and alligator clip), hair ties, romantic hair ribbon and hair bands.
Jump to:
🎥Video Tutorial
Here are the full video tutorial for this free crochet bow pattern. The detail list of supplies, downloadable free pattern as well as step-by-step tutorial with written instructions and images are right below.
🧾Tools and Supplies

- Worsted weight yarn (or any yarn of medium thickness)
- 2.5 mm crochet hook
- Tapestry needle
- Scissors
- Stitch markers (optional)
🪡Stitches Used (Us Terms)
- Chain (ch)
- Single crochet (sc)
- Stitch (st)
✂️How to Make
Step 1: Crochet the main part of the bow.
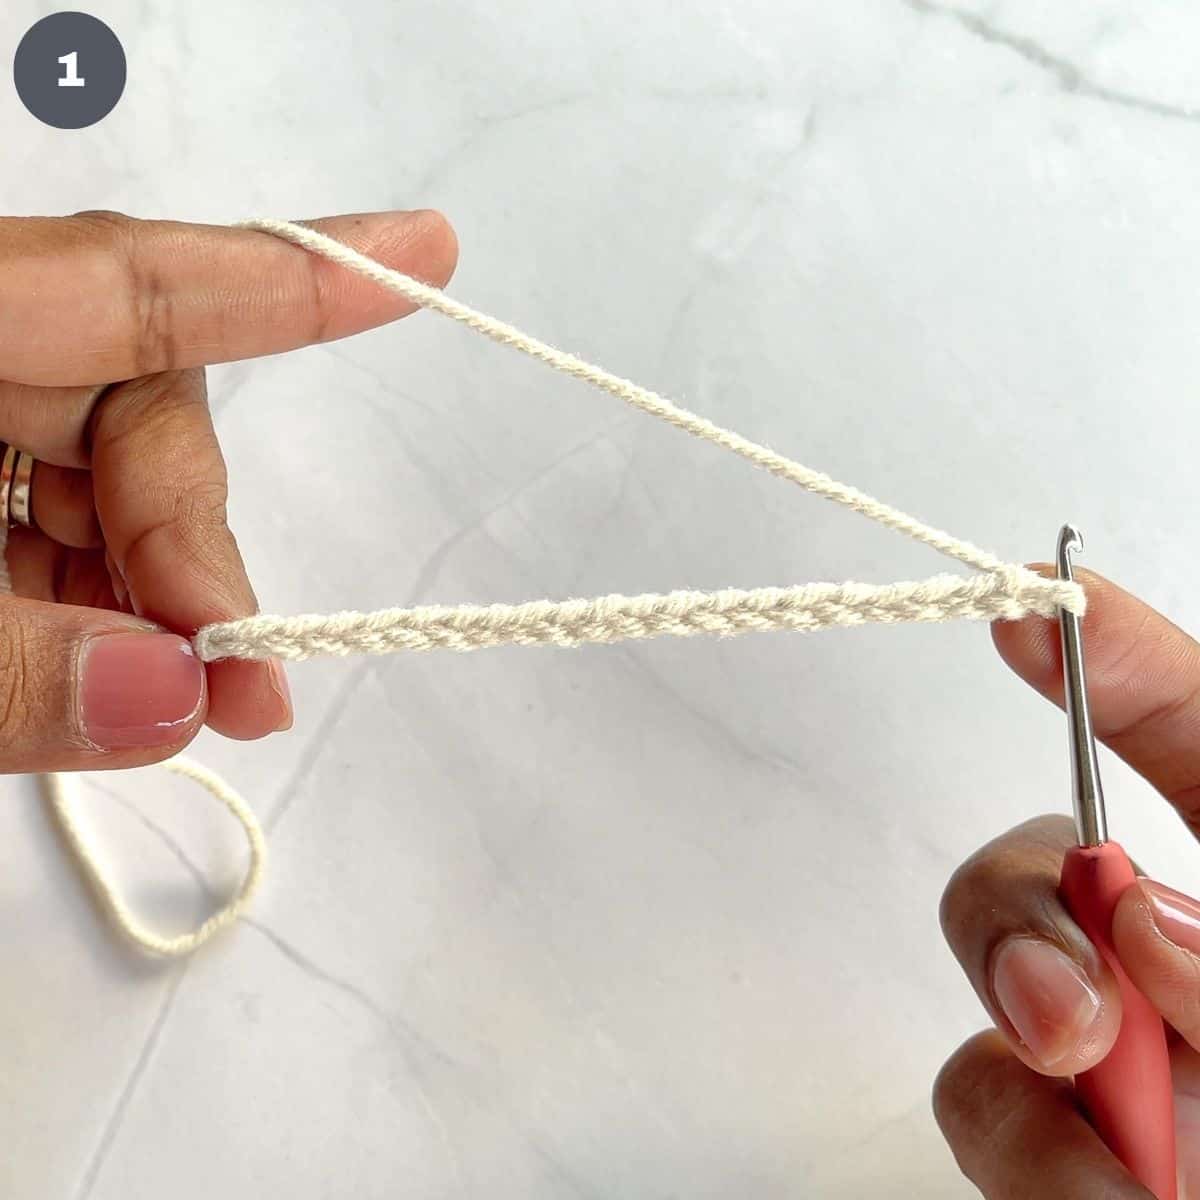
Make a slip knot and ch 20 (image 1).

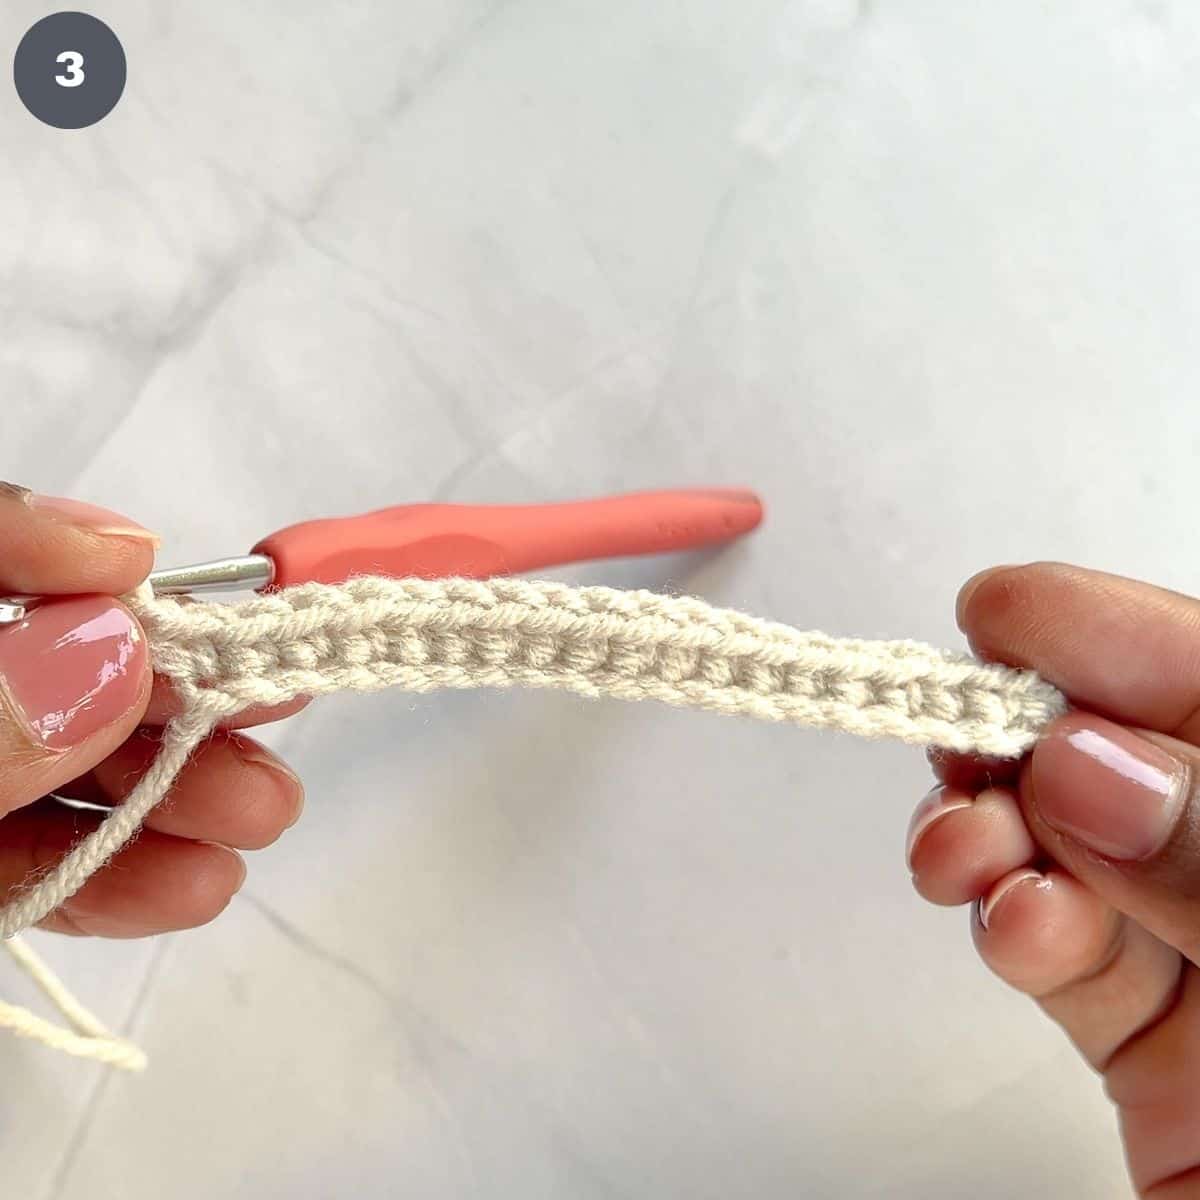
Row 1: Work 1 sc in the second st from hook (image 2). Continue with one sc in each st until the end of the row. You should have 19 sc. Ch 1(image 3).
Row 2: Turn over. Work 1 sc in each stitch. You should have 19 sc. Ch 1.
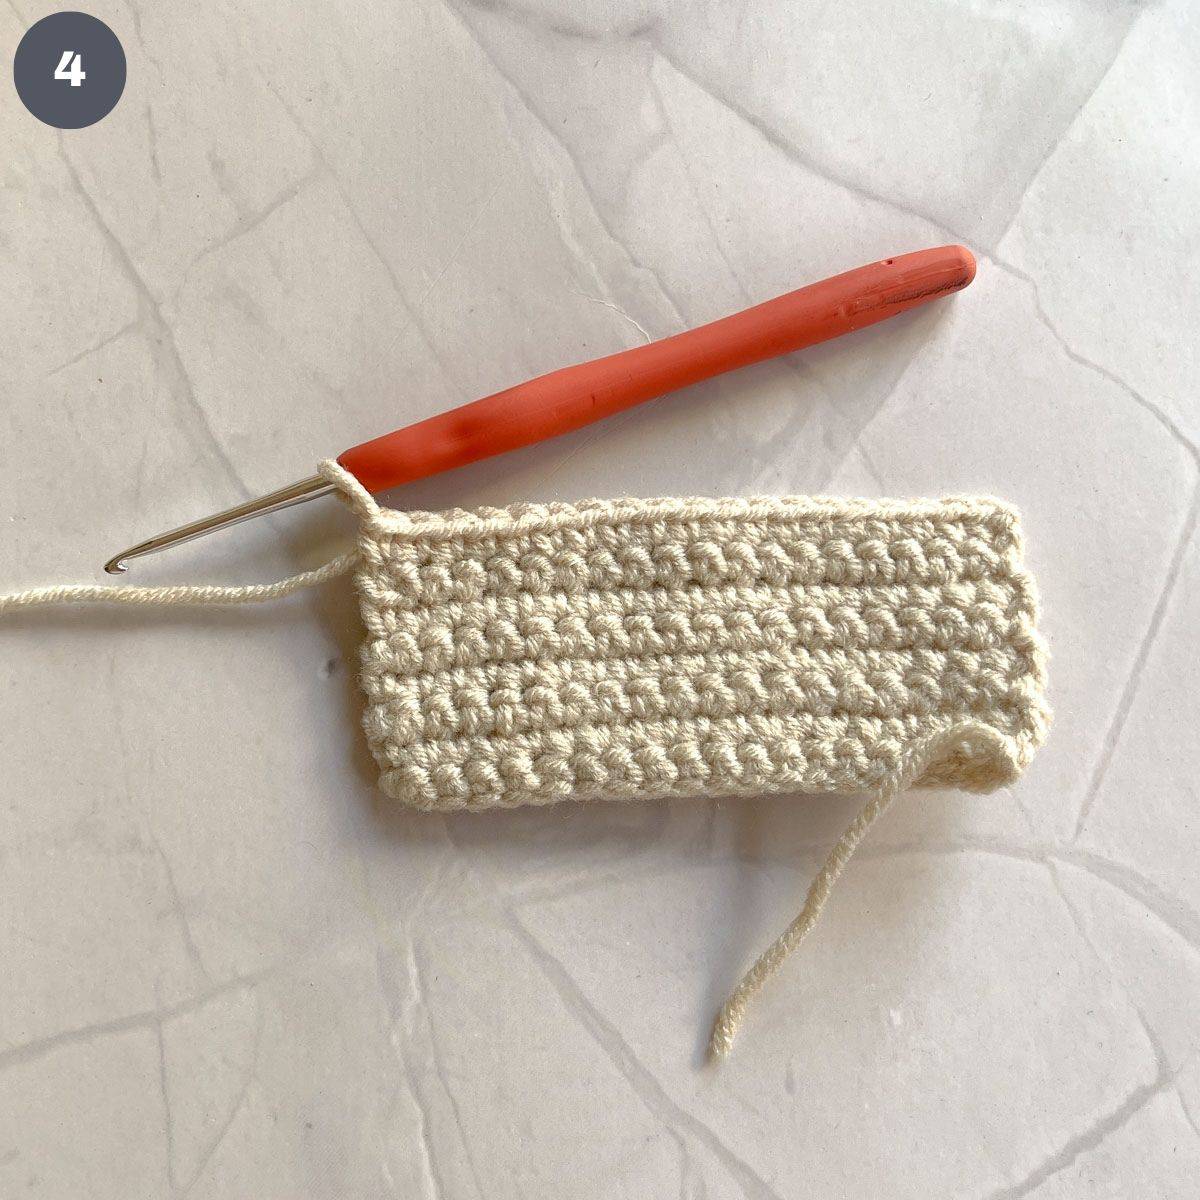
Rows 3 - 8: Repeat row 2 (image 4).
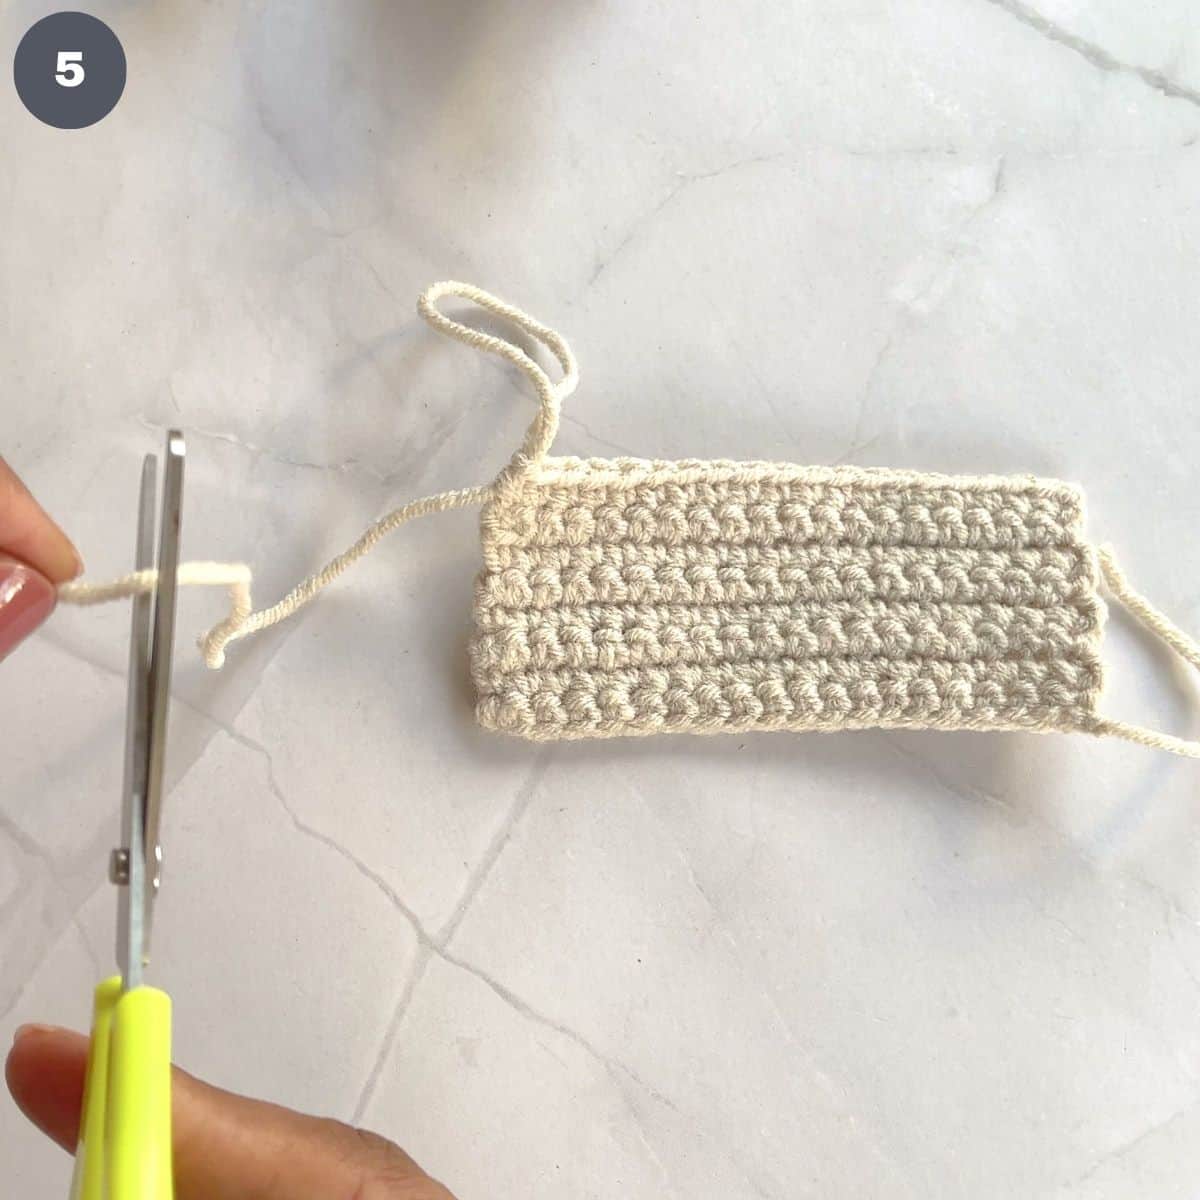
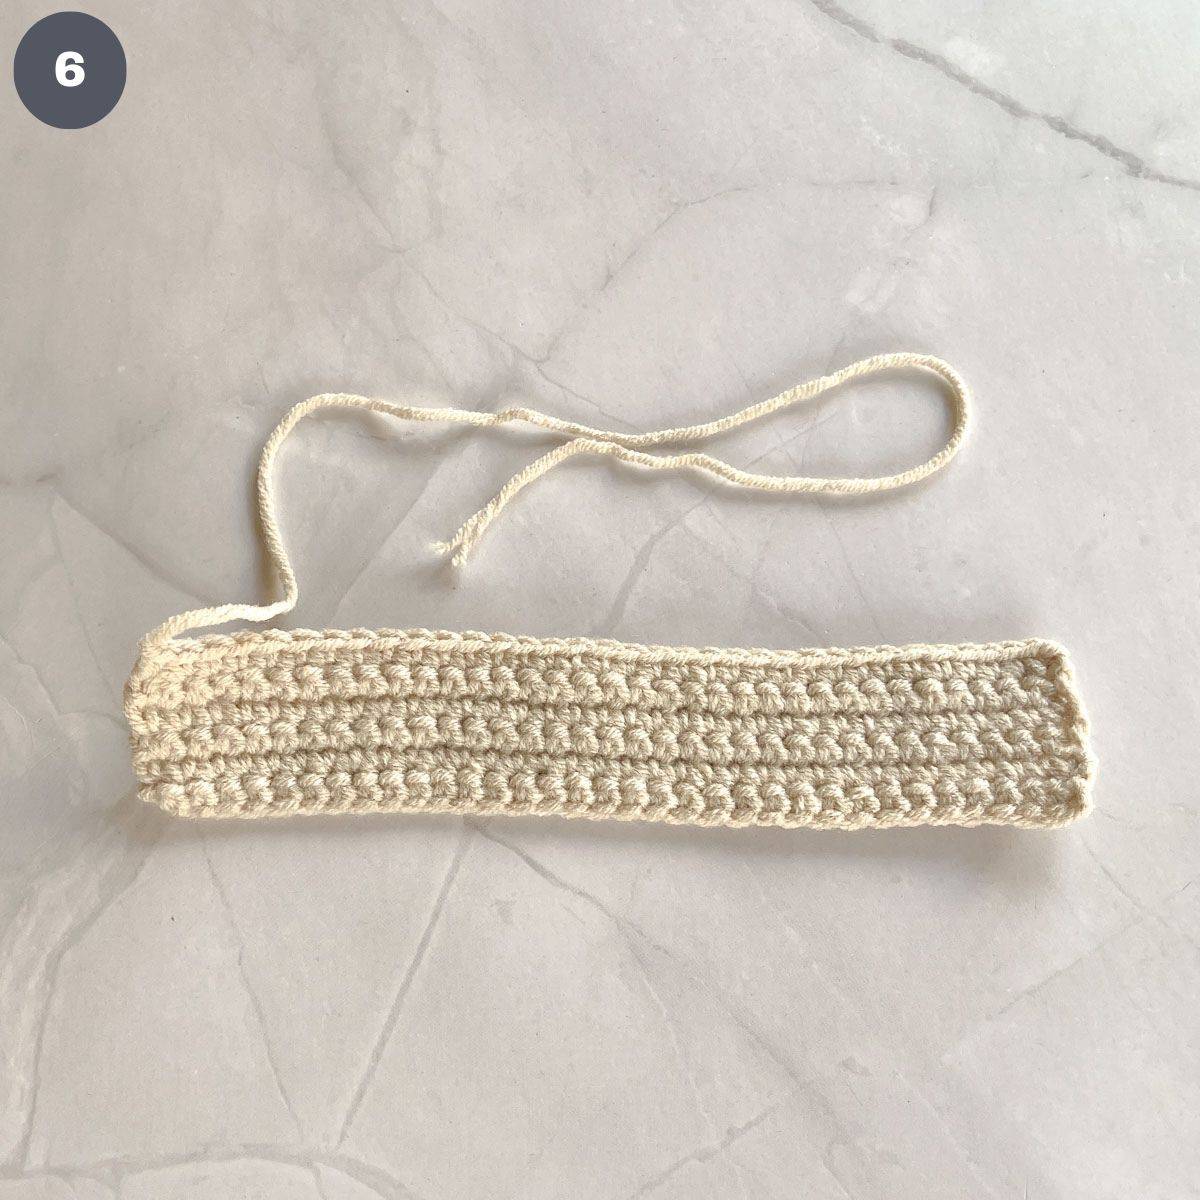
Ch 1. Remove the hook and cut the yarn leaving a long tail for finishing (image 5). Pull the yarn to fasten. Set aside. Thread the extra yarn at the slip knot into a tapestry needle. Stich it through a few stitches and cut off the excess.
Step 2: Crochet the tail piece.
Make a slip knot and ch 35.
Row 1: Work 1 sc in the second chain from hook. Continue with one sc in each ch st until the end of the row. You should have 34 sc. Ch 1.
Row 2: Turn over. Work one sc in each stitch. You should have 34 sc. Ch 1.
Rows 3 – 6: Repeat row 2.
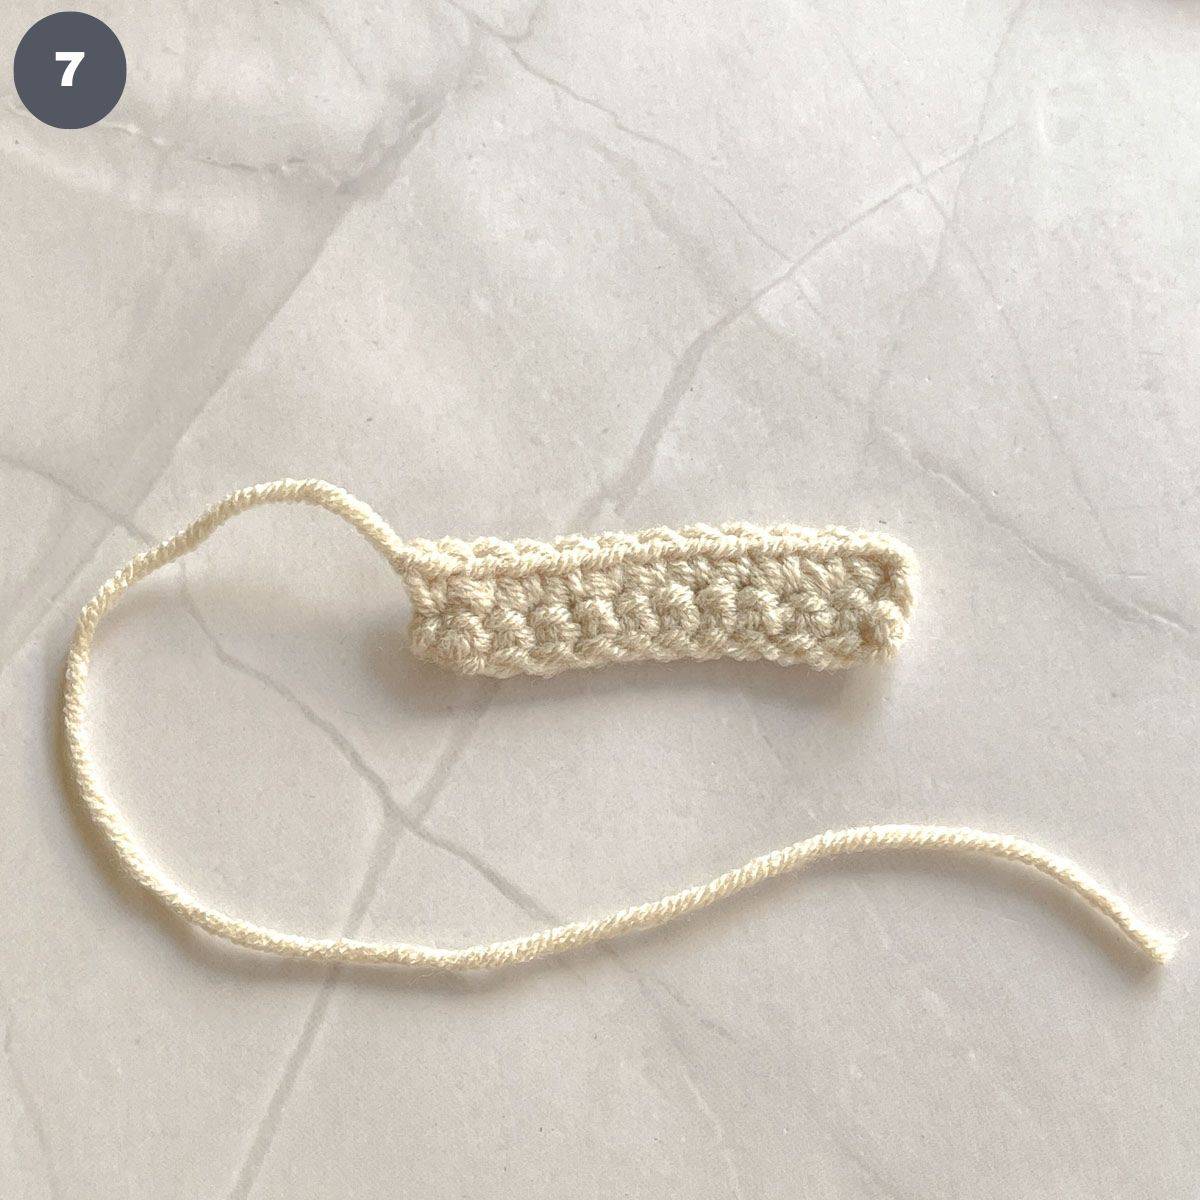
Ch 1. Remove the hook and cut the yarn. Leave a long tail for finishing. Pull yarn to fasten and set aside.
Thread the extra yarn at the slip knot into a tapestry needle. Stich it through a few stitches and cut off the excess (image 6).
Step 3: Crochet the center piece.
Make a slip knot and ch 12.
Row 1: Work 1 sc in the second chain from hook. Continue with one sc in each ch until the end of the row. You should have 11 sc. Ch 1.
Row 2: Turn over. Work one sc in each stitch. You should have 11 sc.
Ch 1. Remove the hook and cut the yarn, leaving a long tail for finishing. Pull yarn to fasten and set aside.
Thread the extra yarn at the slip knot into a tapestry needle. Stich it through a few stitches and cut off the excess (image 7).
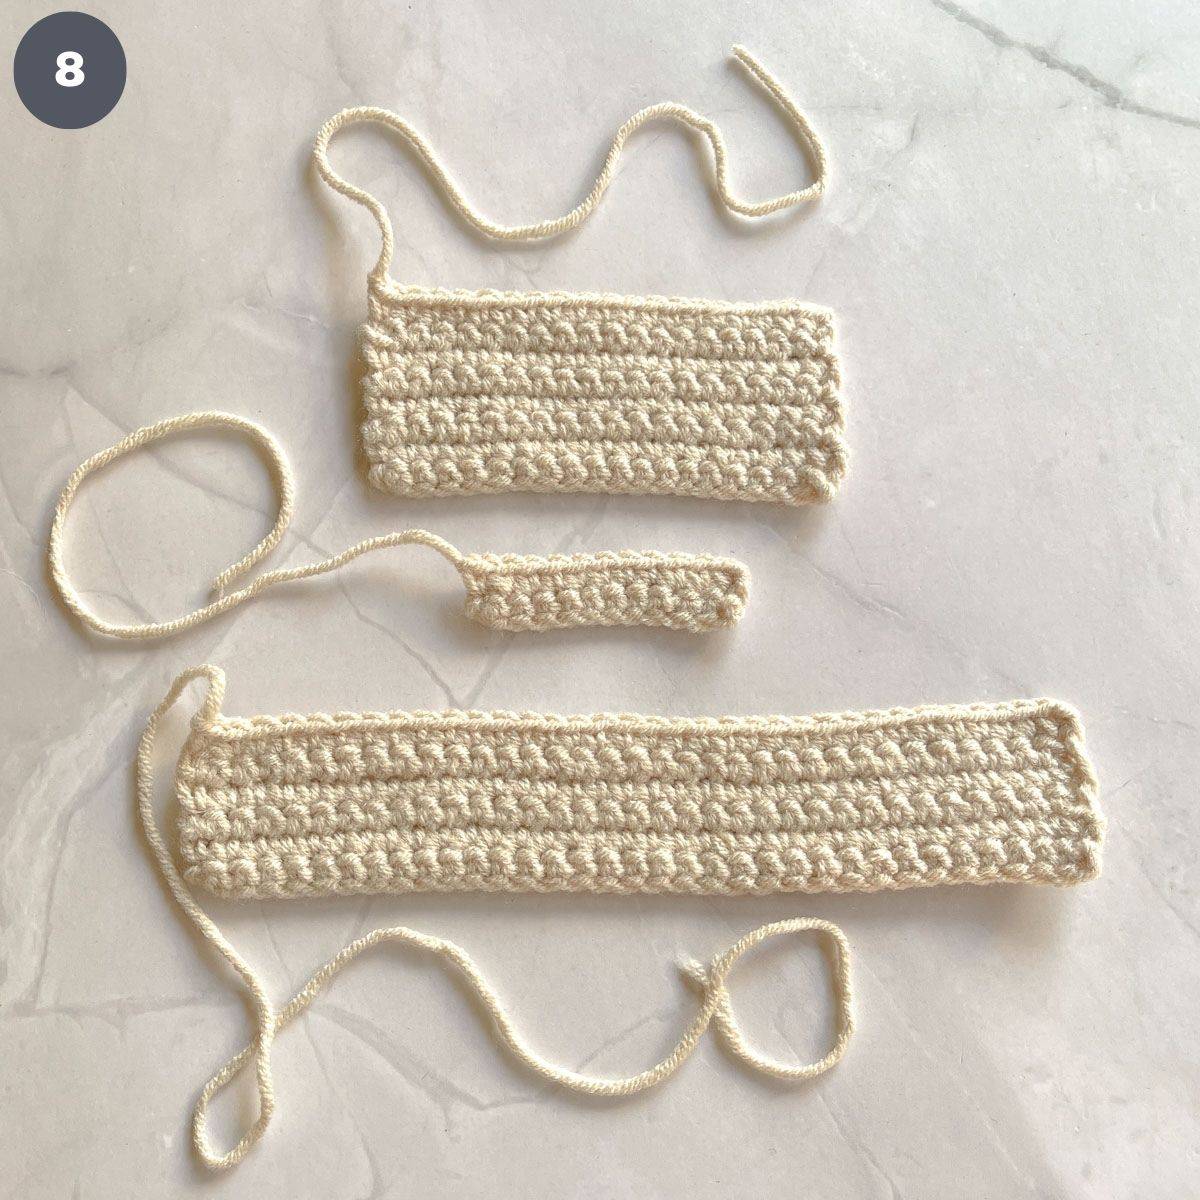
You should have 3 crocheted pieces as shown in image 8:
Step 4: Stitch the bow.

Start with the main part of the bow. Thread the tail yarn into a tapestry needle.
Fold the crocheted piece into 2 and mark the center with a stitch marker (image 9).
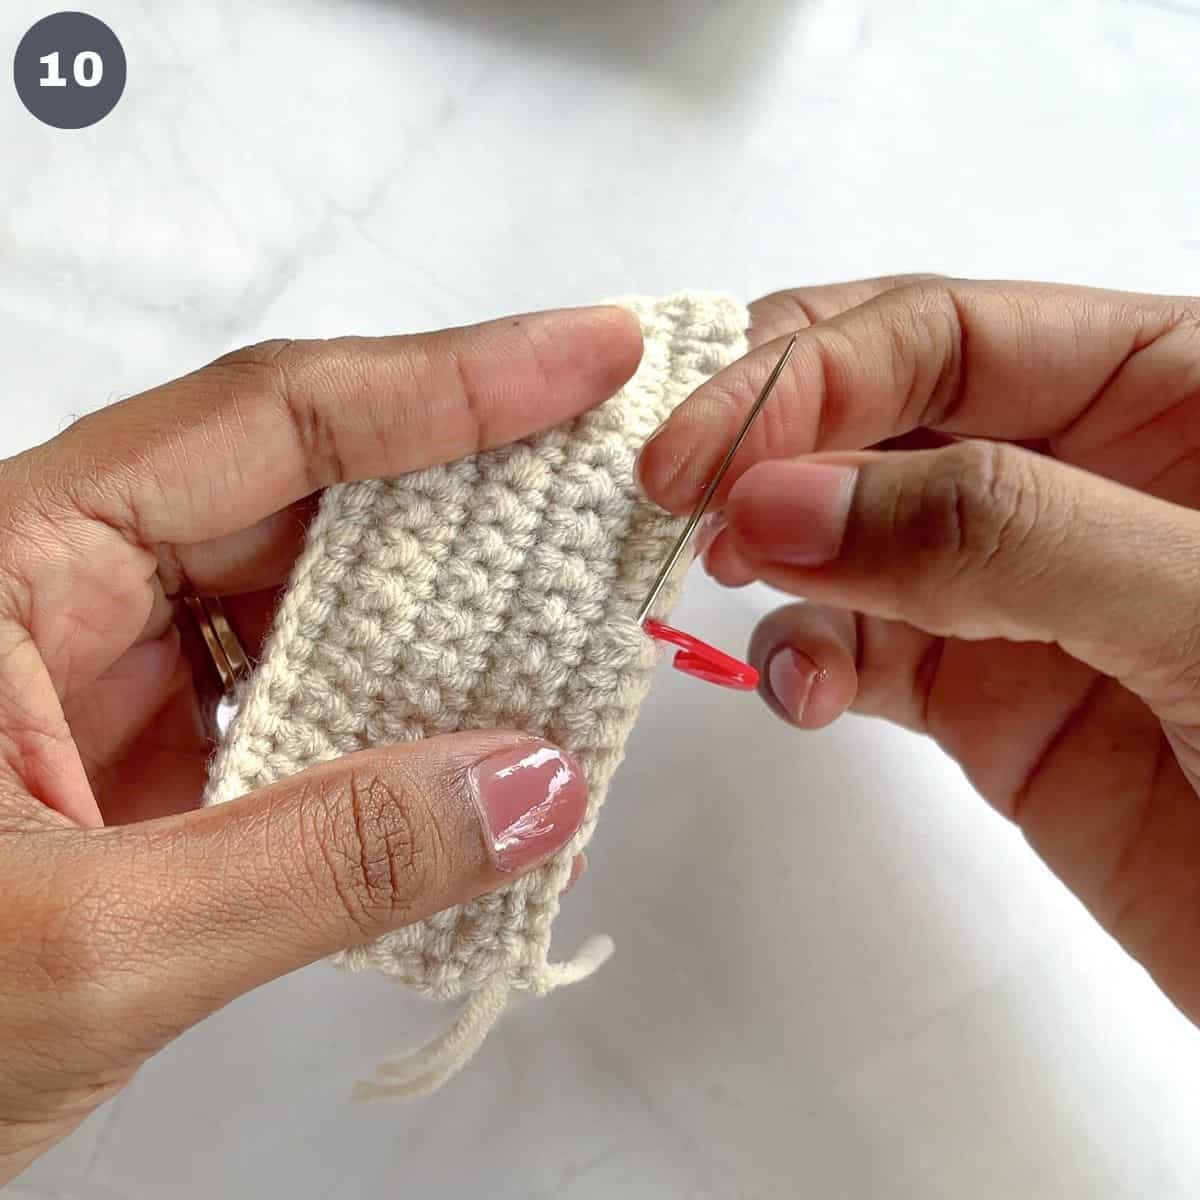
Unfold and thread the needle though the crochet stitches to the stitch marker (image 10).
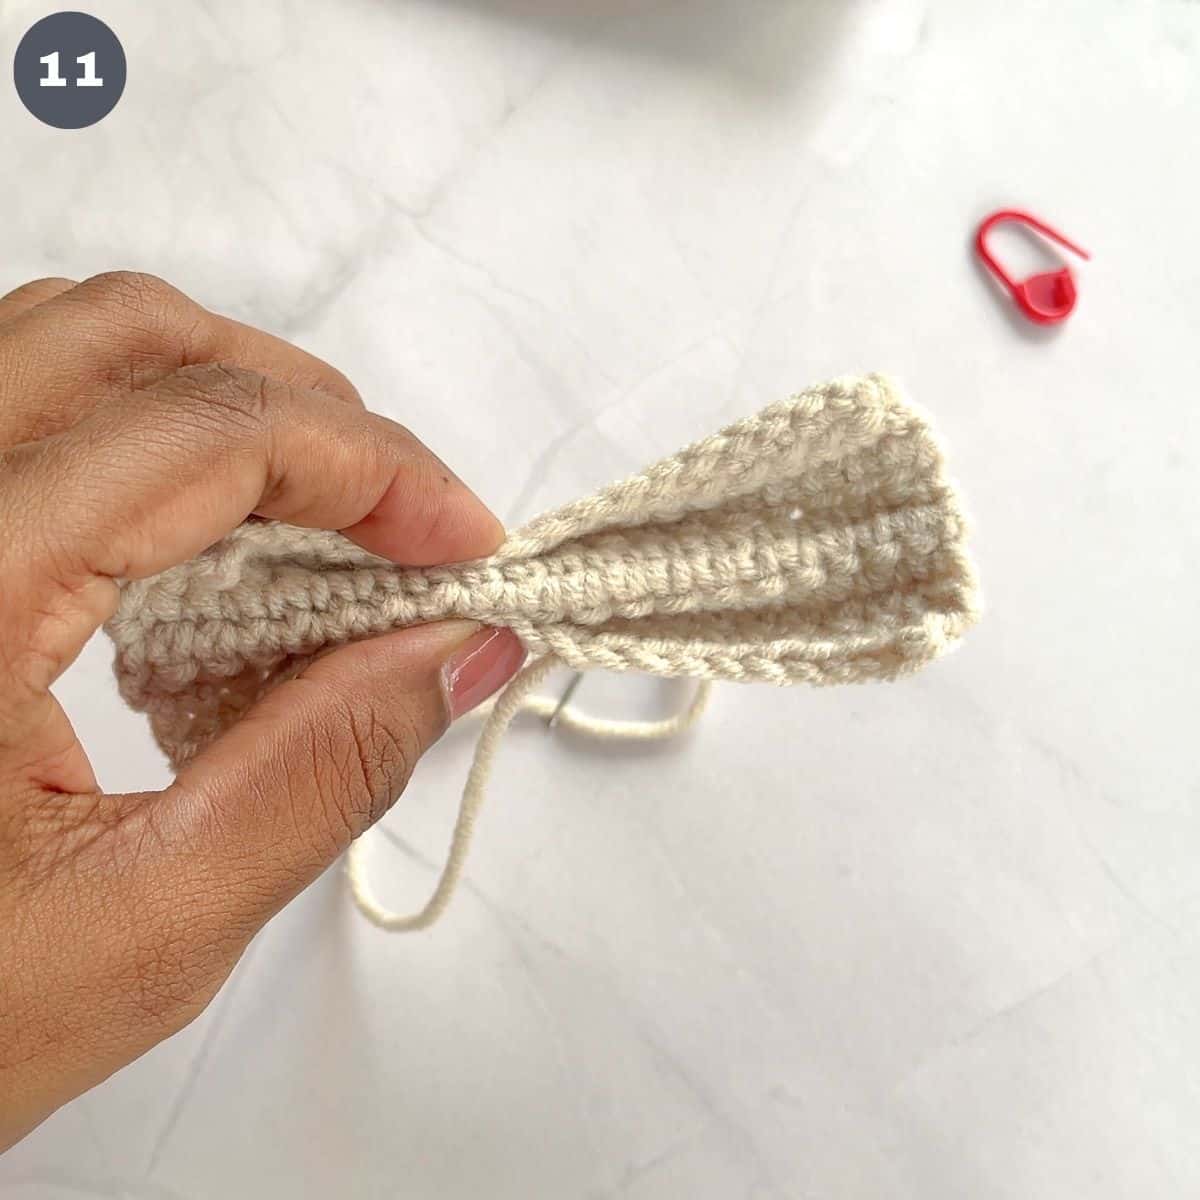
Fold the piece again, this time horizontally, into a ‘w’ to form a bow shape (image 11).
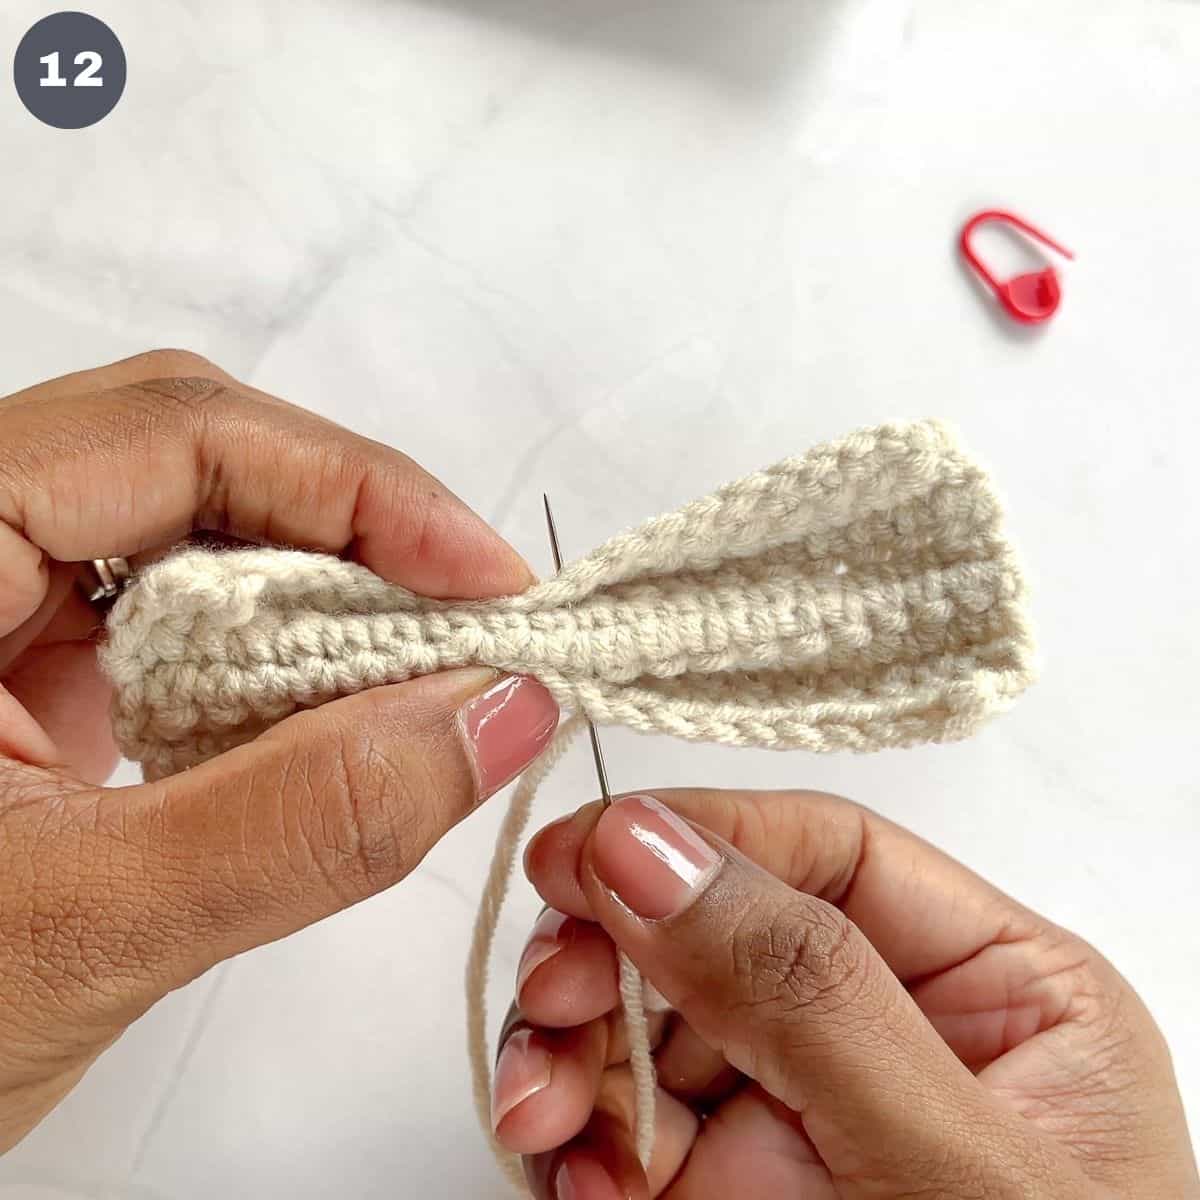
Stitch the folds with the needle and yarn twice (image 12).
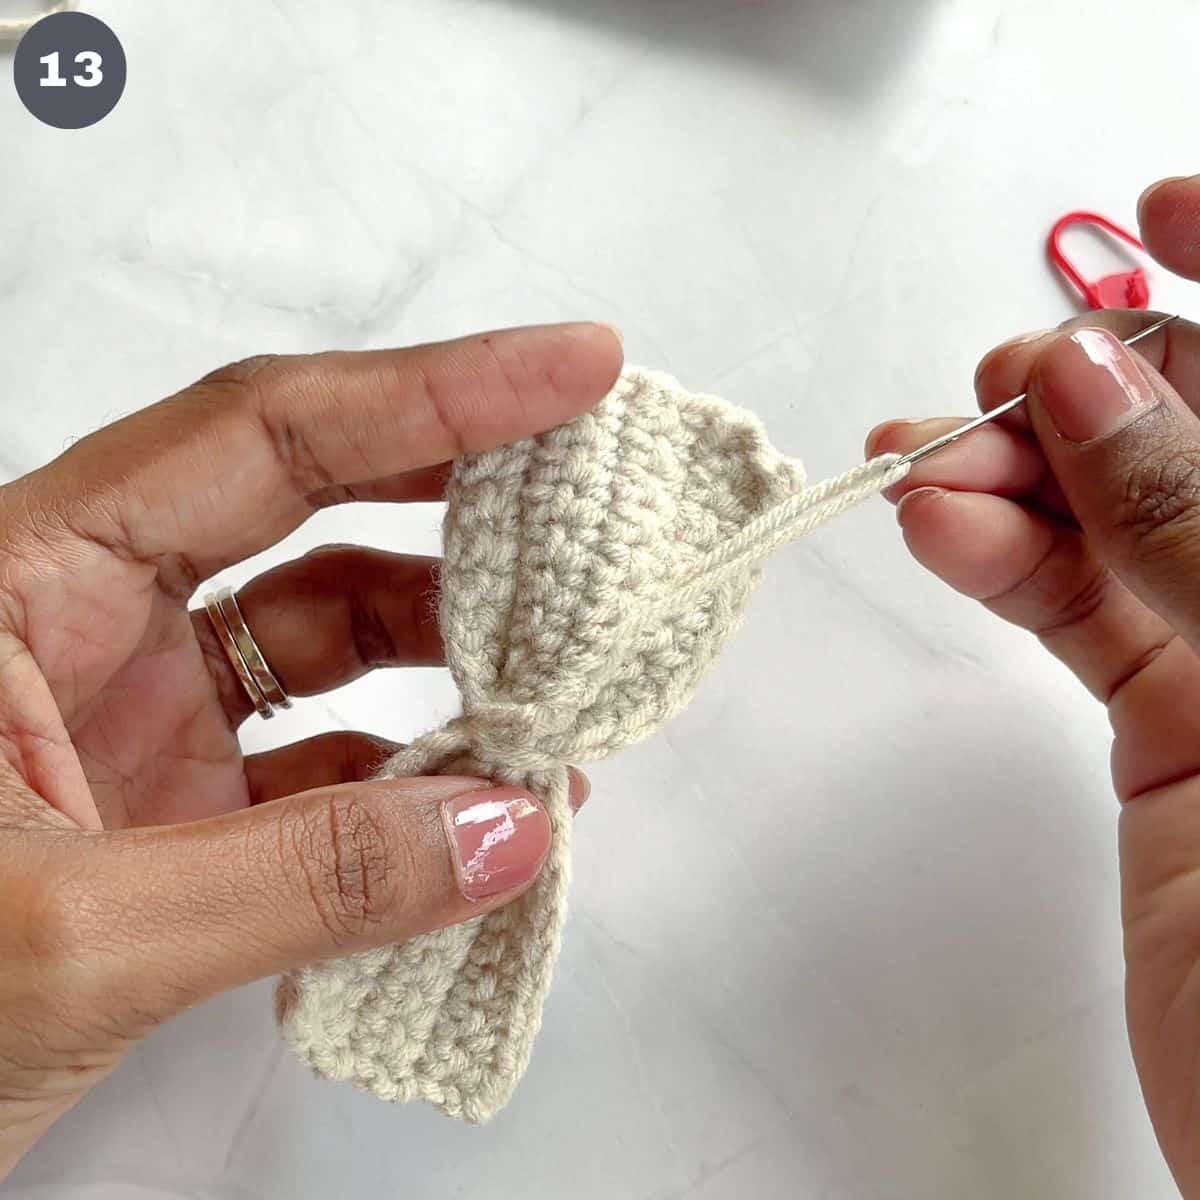
Wrap the excess yarn around the middle of the bow to tighten the folds and wrap yarn around the needle to fasten with a simple knot. Thread the excess yarn though a few stitches at the side and trim off the excess (image 13).
Step 5: Add the tails.
Thread the tail yarn into the needle.

Mark the center of the rectangle with a stitch marker. Unfold and thread the needle through the crochet stitches to the center point. Remove the marker.
Next, fold the tail piece horizontally and stitch twice to hold the fold (image 14).
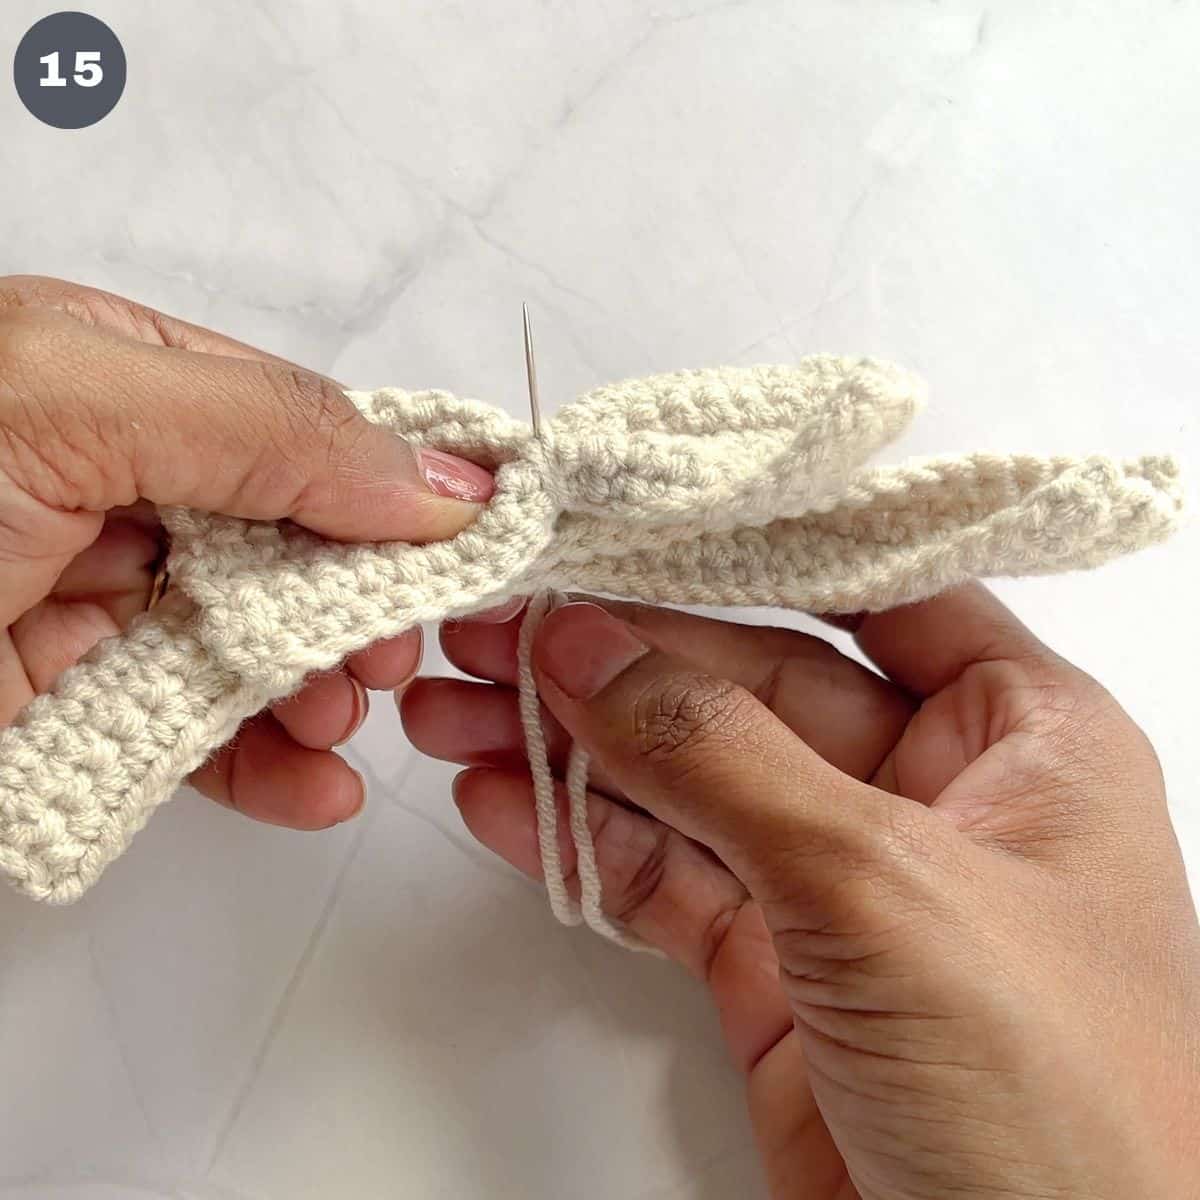
Place the folded tail piece at the back of the bow and stitch together (image 15). Fasten and trim off excess yarn by running it through a few stitches on the bow.
Step 6: Add the centerpiece.
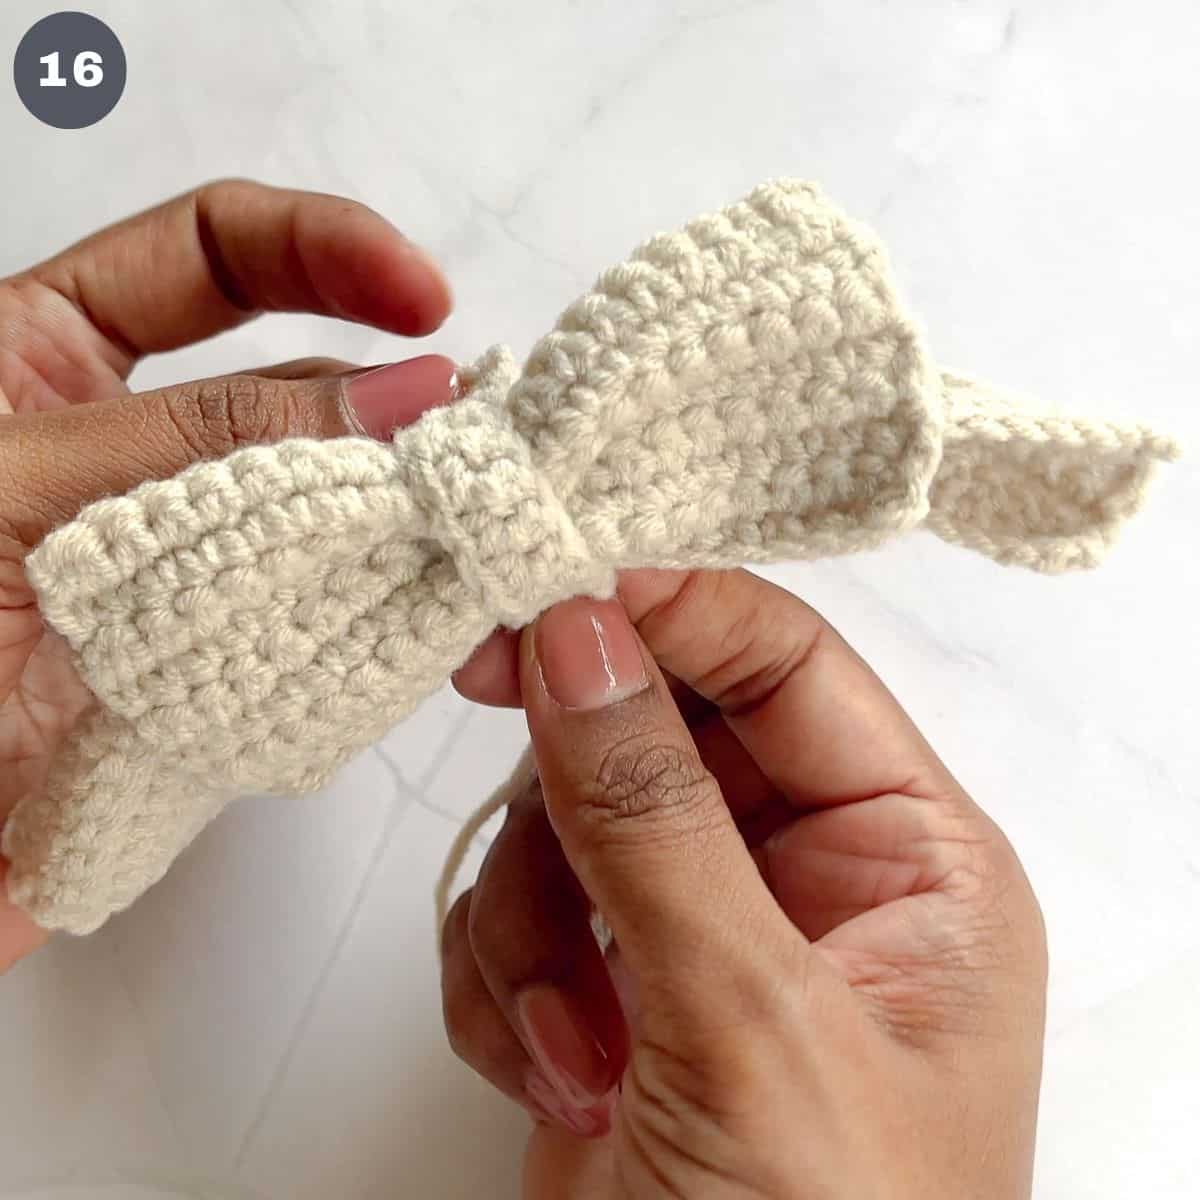
Thread the tail yarn of the center piece into the needle. Place the center piece of the bow at the front of the bow. Wrap it around the middle of the bow and bring both ends to the back (image 16).
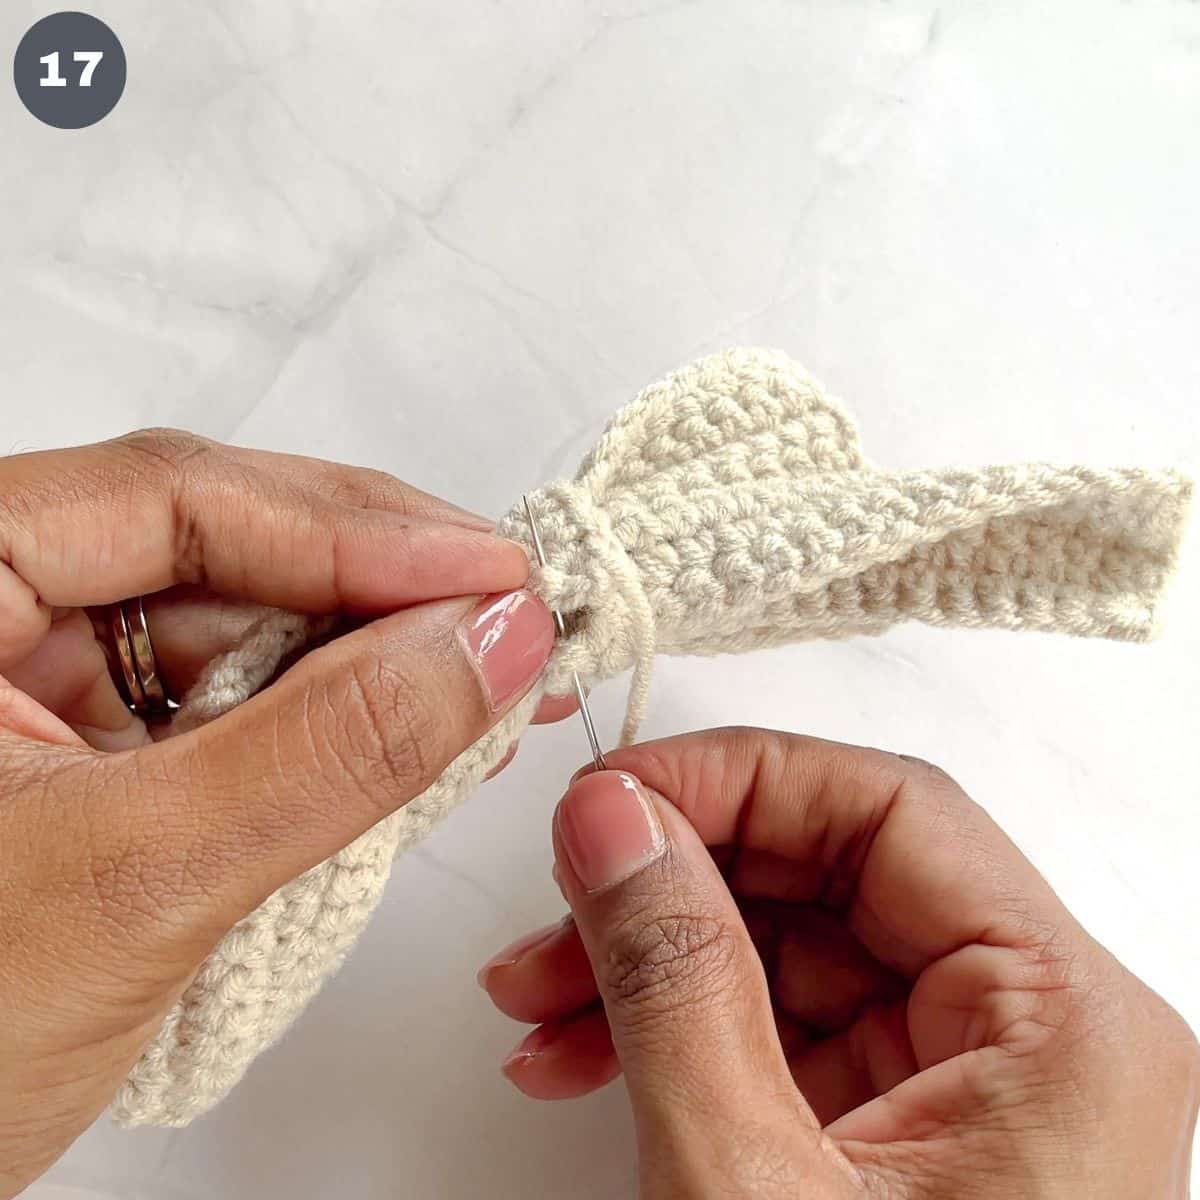
Stitch a few times(image 17).
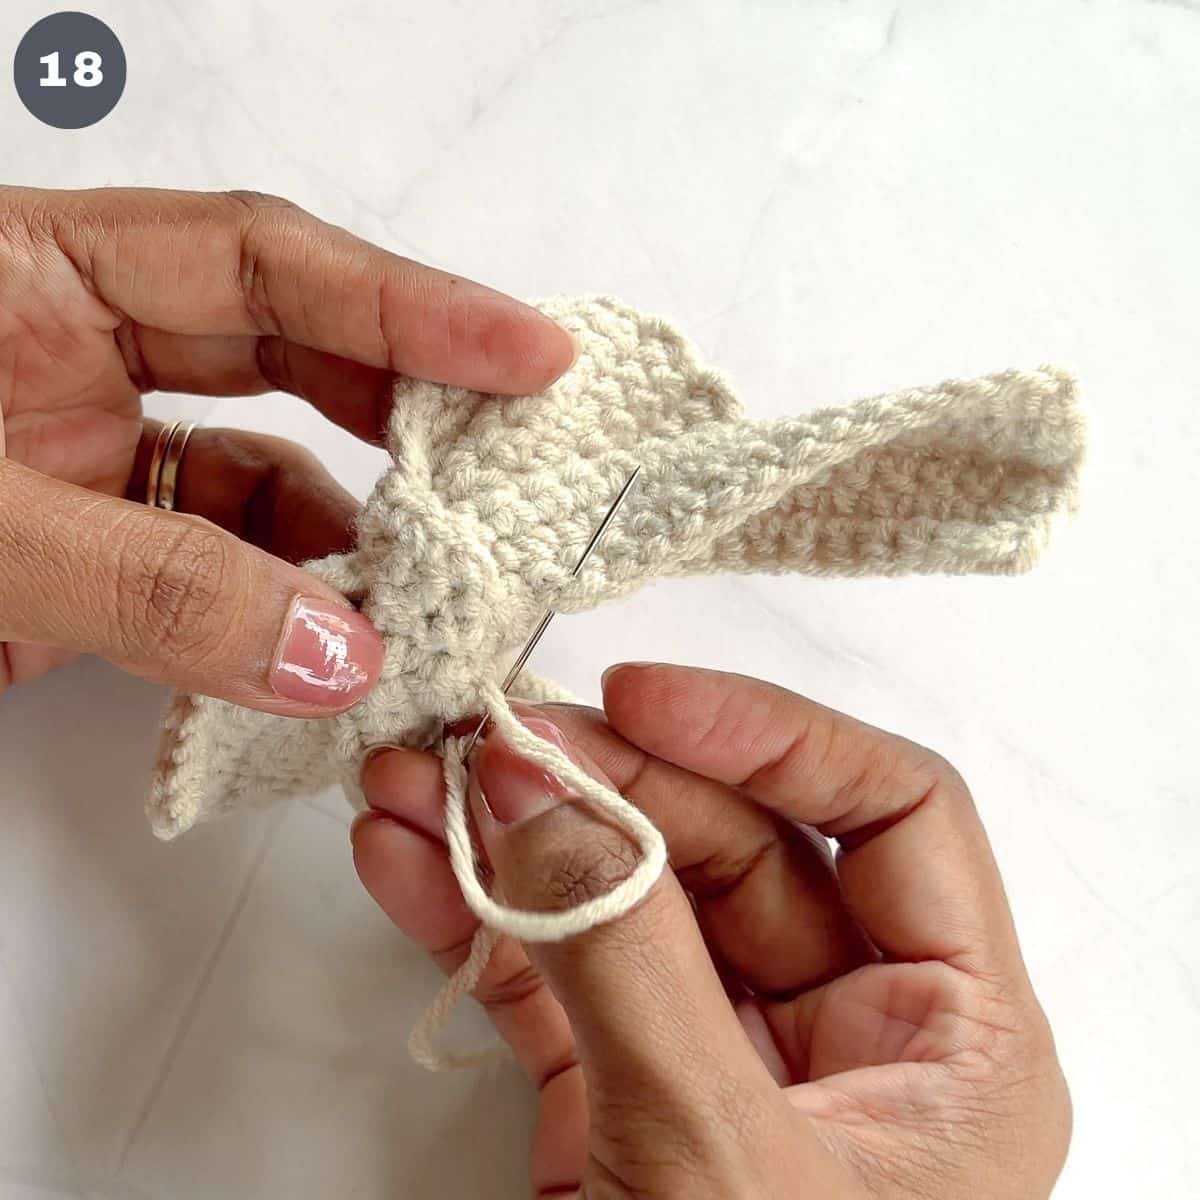
Thread the yarn toward the bottom of the bow and place 2 stiches to bring the tails of the bow together to the middle (image 18).
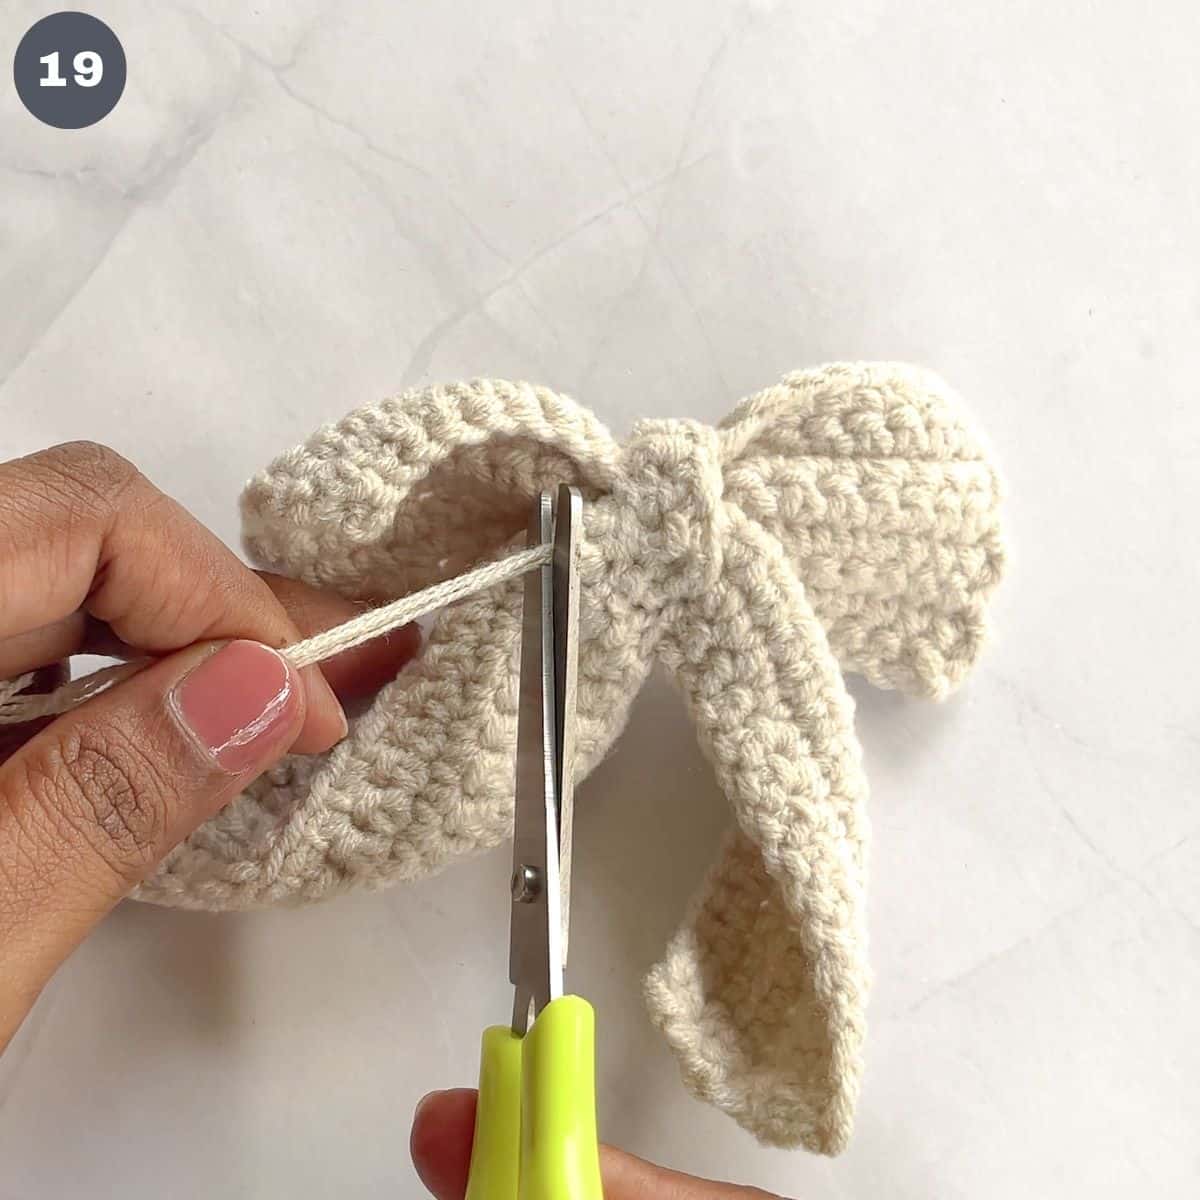
Thread the yarn back to the center and make a simple knot to fasten.
Finally, thread it through a few stitches and cut off the end of the yarn (image 19).
And that completes the easy crochet bow tutorial.
Tips
- To make a larger bow, increase the number of starting chains and then increase the number of rows of stitches.
- To make smaller bow, you can reduce the number of starting chains and the number of rows, accordingly. You can also make smaller bows by using thinner yarn without adjusting the number of stitches and rows.

Downloadable Template
Here is the free downloadable template for the crochet bow pattern above. Click on the image below to retrieve the free large print pattern.
Happy crocheting !
catie says
First time crocheting and these came together super quick! They turned out super cute-my daughter loves them 😀 Thank you!
Alafaye says
This is SOOOO cute!! I love the aesthetics of it. 🙂 !!! 🙂
Peyton says
I was making these to put on a baby beanie and they turned out so cute!! I made it a bit smaller using a different yarn but I still love it❤️🎀🧶!
Belinda Beller says
Wonderful instructions. Thank you so much.